How to Photography - DIY Bokeh!

How to Photography - Make your own Bokeh!
Tired of hum-drum family snap shots and the same old boring, ordinary-looking holiday pics? Looking for something different and professional that you would be proud to hang on your wall? Why not spice up your photos with do-it-yourself bokelicious "bokeh"? With this "how-to-photography" tutorial you can learn how to do just that!
Explore your creativity and add that extra touch to your photos that you have always been looking for! Make any shape you want from "Jack-O-Lanterns to ghoulish ghoulies and bats!
For those of you who don't know, in photography, "bokeh" is the quality of out-of-focus or "blurry" parts of an image rendered by the camera lens when you take a picture. It comes from the Japanese word "boke" which means blur or haze. "Bokeh" makes photographs visually appealing and is one of the most popular subjects in photography today. It gives pictures a dreamy, outer worldly look and adds a touch of class to your shots .
You can make your own "bokeh" appear any shape you want but with today's "how-to-photography" tutorial I'm going to show you how to make Halloween shaped "bokeh" with both images and words! You can easily change the shape later to anything you want by applying the same techniques explained below. Excited? Want to learn more? Let's get started then!
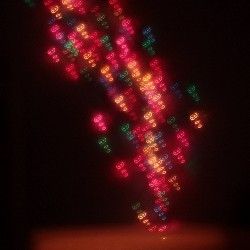
Photo Credit: Boo by Arnaud S.
More Great How-to-Photography Tutorials.
- Beginning Photography From a Point-and-Shoot to a DSLR!
Want to take awe-inspiring, mind-blowing, professional photos but feel daunted because all you have is a point-and-shoot? Well, there's hope for you! - How to Photography - How to Photograph a Splash!
My how-to-photography tutorials show beginners how to take stunning photographs in a few simple steps. This How-to-Photography tutorial is on How to Photograph a Splash. - Best Gifts for Photographers!
A unique collection of gifts that has been compiled by Photographers for Photographers, Best gifts for photographers is a collection of the most unusual and appealing gifts that any photographer would be proud to have. - Color Your World with Waterdrops!
Want to photograph beautiful water drops just like the ones you see on popular photography magazine covers or on online photography websites? I'm going to show you the basics of water drop photography so easy that anyone can do it! Now you too can ta
The Magic of Bokeh in Books and DVD. - From lensbaby tips to an incredible plug-in software for stunning simulated bokeh effects!
Don't have a DSLR camera or prime lens kit? This author recommends Alien Skin Bokeh, an absolutely amazing program that will simulate stunning bokeh effects on any shot! Works on both Windows and Mac platforms. This software is easy to use with many types of bokeh shapes and effects to choose from. No need to be a computer geek to quickly produce amazing results. Well worth a try.

How to Make Halloween "bokeh" or bokeh for any occasion. - First of all, let me tell you that there has been a lot said about DIY "bokeh" but this one in my exp

Photo Credit: how to make "bokeh" by Arnaud S.

What you will need:
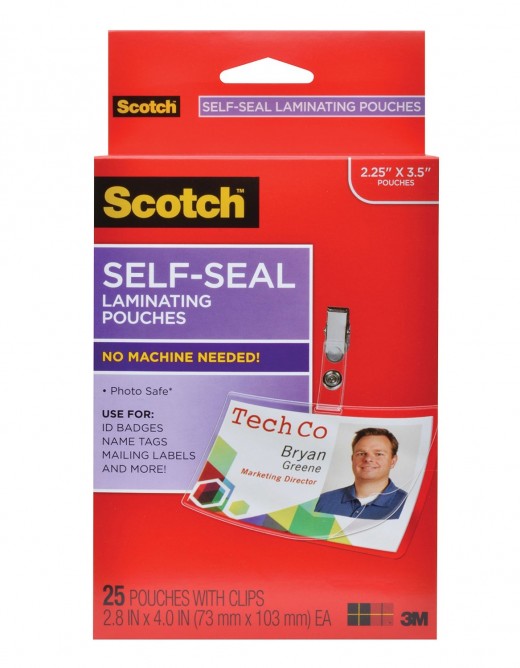
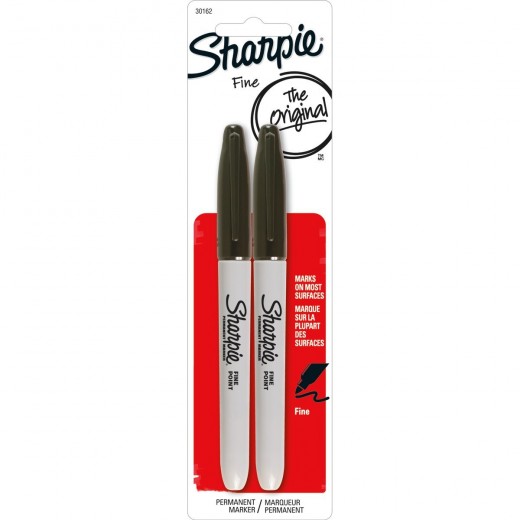
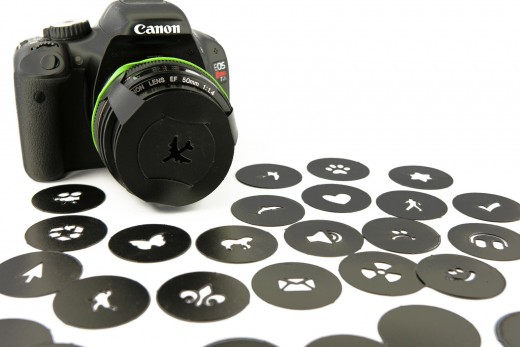
a black piece of cardboard that won't let the light through (I used a black plastic binder)a pair of scissorsscotch tapea permanent marker with a fine tip (I used a Sharpie Fine Point)some transparent plastic to draw your "bookeh" shapes (I used one of those plastic sheets you use for laminating)You will also need a "fast" lens like the one seen in this picture. - A 50mm f1.8 will do nicely.

Photo Credit: how to make "bokeh" by Arnaud S.

Note: You cannot do this with a point-and-shoot camera as you will not get the desired "bokeh" effect!
Explanation below!
Why can't I use a Point-and-Shoot? Why do I need a fast lens? - A "fast" lens has a nice large aperture which, generally speaking, will give you "better" bokeh.

Generally, portrait and telephoto lenses with large maximum apertures yield more pleasant-looking bokeh than cheaper consumer zoom lenses. So, while all lenses are capable of producing out of focus blur, not all lenses are capable of rendering beautiful bokeh. That is why, generally speaking, you cannot use a Point-and-Shoot because it will not give you the same "quality" bokeh as a fast lens. However, I must add that some Point-and-Shoot digital cameras now allow you to attach a fast lens to the camera. If this is the case then you are still in the game!
That said, so what is a good or beautiful bokeh? A good bokeh pleases our eyes and our perception of the image. With "good" bokeh, the background blur should appear soft and "creamy", with smooth round circles of light and no hard edges!
1. Let's get started. Measure the lens on the black plastic of the binder.
You will need a strip long enough to wrap around your lens.
Mark clearly where you will be cutting.

Mark where you will cut
2. Cut the strip carefully according to measure.

Make sure the newly cut strip wraps entirely around your lens. Now tape the sides of the strip.

3. Time to make the cover for your lens where your "bokeh" shapes will go. - Measure a circle for your lens making sure it is wide enough to cover the lens enti

You can place your lens face down (without the lens cap) and trace a line all around it or use a cup large enough to cover your lens and trace a circle around it. Either way, you want to make sure your circle covers your lens entirely.
Cut out the circle carefully.

4. Make a small hole in the center of your circle. - Measure carefully making sure it is centered. Remember, this is where your lens has to focus through so you


Tip: You can use a compass to find the center of your circle or else use a piece of paper exactly the same size as your circle and fold it twice in the center. This gives you the exact center where the folded lines meet. Place this over your plastic circle and mark the center.
5. Tape the lens cap onto the side strip. - Be careful to tape all around so as not to let any light in.

Photo Credit: how to make "bokeh" by Arnaud S.
6. Now, add two "slots" to hold your "bokeh" shapes. - These are two strips of cardboard or plastic, one on the top and one on the bottom of your circle, where

This makes it easy to change your "bokeh" shapes as needed!
7. Now let's make Halloween "bokeh" shapes! - Cut a strip of transparent plastc small enough to fit into your circle slots.

You can use any transparent plastic for your bokeh shapes but make sure it is clear enough for your lens to focus through. - I used self-laminating sheets which

8. With your pen, draw whatever shape you would like to appear in your "bokeh". - I started off with the words "BOO"! since it IS Halloween boo-keh that we are


Tip: Use a permanent marker when you draw your shapes! I used a Sharpie Fine-Tip pen! They are excellent for small detail!
Remember, a Permanent Ink felt-tip pen is what you are looking for. - I used a "Sharpie" Fine-Point. It doesn't cost much and is an excellent pen for drawing fi

Here are all the different Halloween shapes that I drew. - I'm sure you can think of a lot more shapes. There is absolutely no end to the amount of "bokeh" that

My arsenal of Halloween "bokeh"!
9. You can now insert your "bokeh" shapes between the slots like this.

Photo Credit: how to make "bokeh" by Arnaud S.
Now you are ready to take amazing "bokelicious" shots for any occasion!

TIPS:
Focus on an object from a very close distance (as close as the lens will allow, keeping the object in focus), making sure that there are no objects at least 5-6 feet behind it.
Make sure to be on the same level as the object itself, so that you are not looking down on it.
Do not use a plain wall as your background - try to find a colorful background, preferably with some lights on it. Stringing some Christmas Tree lights up over a door can make a perfect background for a "bokeh" test!

Once you find a good test subject with a suitable background, set your camera to "Aperture Priority" mode and set your aperture to the lowest number. On most consumer zoom lenses, the lowest aperture is typically f/3.5, while on prime and professional zoom lenses, it can be between f/1.2 and f/2.8.
Once the aperture is set to the lowest value, take a picture of your subject and take a look at the rear LCD of your camera. The subject should be in focus, while the background is blurred.
If you have a good lens, the "bokeh" should be soft and fuzzy-looking, pleasing to the eye. The circular reflections should be round and soft, with no hard edges.
Some examples of Bookelicious Halloween Bokeh!
Click thumbnail to view full-size


Bokeh Master kit: For those of you who aren't the "Do-It-Yourself" type. - This kit is pre-made, a lot of fun, comes with the lens cover and all kinds of bokeh

The kit works with almost any wide aperture lens with a filter size.
Tested with the following lenses: Nikon 50mm f/1.8, 50mm f/1.4, 85mm f/1.8, 28-105mm f/3.5-f/4.5, 70-300mm f/4.5-5.6, Canon EF 50mm f/1.8, EF 50mm f/1.4, EF 85mm f/1.8, EF 100mm f/2.8L IS USM, EF 75-300mm f/4-5.6, Sigma 30mm f/1.4
- Allows you to create your own special effect images "in camera" without having to rely on post-production software
- Can be placed over a UV filter
- For the wedding or party photographer, this kit offers the opportunity for creating images that other photographers may not be able to replicate
- Allows you to turn a night scene or landscape into something completely different and unique
DIY Photography Bokeh Masters Kit, Special Effects System for Portraits
Take the Halloween Bokeh Poll.

Have you ever made your own Bokeh?
This lens received a purple star!

This lens won the Purple Star award. Purple Stars are awarded sporadically, for editorial excellence, to the SQUIDOO Team's very favorite lenses on the site. And only 1000 lenses are nominated each year! So you can see why this is a GREAT honor! A big THANK YOU to those who nominated this lens. For this I remain forever grateful!


My Halloween Bookeh Visitors!